Can You Upload Wordpress Template in Dreamweaver
There are tons of dissimilar tools and platforms you can use to build out your website. Some are more than beginner friendly than others. Merely, no affair your feel level you'll be able to find a site builder that'southward perfect for your needs.
If you've never heard of Dreamweaver before it's an application from Adobe that allows you to design, build, and deploy websites.
Fifty-fifty if yous've never touched any code before in your life you can make Dreamweaver piece of work for you through it's intuitive visual interface.
Below yous'll learn how to get started with Dreamweaver. You lot'll acquire what Dreamweaver actually is, what makes it stand up out, and finally how you can create your kickoff website using this tool and upload information technology to your server.
What is Dreamweaver
Dreamweaver is a website edifice software that's been effectually for over xx years. It was kickoff developed by Macromedia and then was acquired by Adobe in 2005. The software has gone through multiple iterations and is now a part of the Adobe Creative Cloud suite. This means that y'all'll need to buy a monthly subscription in order to apply the software.
To put information technology just, Dreamweaver is software that lets you build, blueprint, and publish websites. It'southward a native awarding when means that you install information technology on your PC or Mac.
It'southward a flexible awarding in that you can build your website entirely through the visual editor, or solely via lawmaking. You tin also apply the two together (provided y'all know the basics of coding), to see how each affects the other.
Information technology also supports a broad variety of languages required to build any blazon of website like HTML, HTML5, CSS, PHP, Javascript, and jQuery. You tin use and edit files that are in other languages, but the code support features will non be available.
Recommended Web Hosting

Cloudways or Bluehost are your all-time bet when information technology comes to web hosting for html congenital sites.
Or read our detailed Cloudways Review >>
The Master Features of Dreamweaver
Overall, Dreamweaver helps to simplify the process of designing and building your website. While being flexible enough to address both the beginner and advanced levels of the market.
Here are the main features that brand this tool stand out:
1. Piece of cake to Use Visual Interface
The visual interface editor is probably the main feature y'all'll exist using when y'all're just starting out. Information technology'south similar to what other beginner builders offer in terms of elevate and driblet functionality. Except with this architect, you'll exist selecting elements with your mouse.
This makes it easy to build out the foundation of your site in record time. While you're doing this Dreamweaver will automatically create the necessary lawmaking for you. And so, you simply upload these files to your server and your website is fix for the world.
2. Built-in Code Editor
Beyond the power to build your site entirely with the visual editor you can also use the code editor to build out your site or make changes to your site's existing design.
The code editor is beginner friendly and has some useful features to help you lot code faster and learn what'south happening at the same time. This makes it useful for beginners to see how the code and design interact as yous place different elements of your site.
As you lot write the code yous'll also meet the visual side change as well. So, yous don't take to preview your site to see the changes you made. It all happens automatically!
Plus, information technology has features like code completion, which will brand suggestions for the lawmaking you're currently writing based upon your current pattern. Plus, a lawmaking collapse feature, which will compress parts of your code when y'all're not currently editing, so that y'all can find what yous're looking for much faster.
3. Role of the Creative Cloud Suite
If you're already familiar with Adobe products, so yous'll feel right at home using Dreamweaver. Even though the commands will be different than say, a tool like Photoshop. The layout and interface behave a consistency across the lath.
So, if y'all love Adobe products and are already using tools in the residual of their artistic suite, then this builder might be a solid investment.
Pros and Cons of Adobe Dreamweaver
Dreamweaver offers you a ton of possibilities. It would exist nearly impossible to break down all of its features here. But hither are a few of the unique advantages that Dreamweaver offers, as well every bit a few reasons you might want to stay abroad and find another website builder.
Dreamweaver Pros
Dreamweaver is an intuitive and flexible tool that does a lot of things right. Here are some of the biggest advantages this software can offering you:
Device Testing
With Dreamweaver, you'll have an instant preview selection that lets you examination and meet how your website will look beyond any device. A lot of other tools have this feature. Merely, with Dreamweaver, all information technology takes is a single click to preview and adjust your site on the fly.
Piece of cake Code Error Testing
When you're tweaking your code or writing it from scratch, there are going to be errors that accumulate over time. With Dreamweaver, you can quickly discover and fix these errors quickly. Instead of having to guess and troubleshoot your site for errors, you lot'll know what's incorrect and how to set up it.
Included Font Selection
Designing your site tin can be a lot of fun. Especially when you start tweaking things like color, layout, font choice, and more. Dreamweaver has a massive font selection built correct into the software. This makes it easy to observe the perfect font for your headers and torso text.
Bundled Stock Photos
If yous've ever published anything online you know how long the stock photograph search can take. Instead of having to search across a variety of stock photo websites you can do it right within the tool. There's a massive choice and you'll be able to notice the perfect photo for your needs.
Interface Personalization
When you first start using Dreamweaver yous might exist overwhelmed with all the dissimilar tools and options available. But, yous can really streamline the advent and use of the site builder past changing the preferences. Once y'all know what you use and what you lot don't you tin craft the appearance of the builder to suit your needs.
Dreamweaver Cons
Still, Dreamweaver isn't perfect. If you're not willing to put in the work of learning how this software works, you might exist better off with a unlike solution. Here are some of the biggest drawbacks of Dreamweaver:
Steeper Learning Curve
There are other site builders solutions like Squarespace, Wix, and WordPress, that brand information technology incredibly like shooting fish in a barrel to build out your first website. Creating a bones site and getting it online with Dreamweaver isn't also difficult, simply creating a site that can practice exactly what y'all want volition accept some time.
Since you're starting with a bare canvas the end event will depend upon your ain creativity and skills. Some users prefer this, but others would prefer a simpler solution that requires absolutely no coding skills. You can practice a lot with Dreamweaver, and a lot of experienced developers prefer using this software for the flexibility it provides.
Luckily there are plenty of tutorials available online, and so you can grow your skills quickly. But, it will have some time and initiative on your role.
Your Site Is Only as Skillful as Your Skills
Beneath you'll acquire how to create a very simple and basic website. You won't need any coding skills to get started, only the power to grasp the basics of what you're doing. Just, if you want to create a site with a lot of additional features, then you'll need a bones familiarly and level of condolement with code to assist you get there.
Plus, if things break, then you'll need to know how to fix them. Or at least troubleshoot until you can set the problem.
With Dreamweaver, you're but express past your noesis of the software and your power to code. You lot can grow these skills in time. But, if you need to get a site online quickly in that location are better options out in that location.
Recurring Subscription Fee (On Top of Hosting)
To get access to Dreamweaver you'll need to pay a monthly subscription fee. For those who are building out multiple sites, or love the software, this price is a no-brainer. But, if you're trying to build out a site on a upkeep you might desire to detect a cheaper solution.
You'll non only have to factor in the cost of the software itself, merely besides the monthly fees you'll pay for hosting, and the yearly fee yous'll pay for a domain proper name.
How to Use Dreamweaver to Build a Website From Scratch
At present that you understand the main features of Dreamweaver it's fourth dimension to show them in activity. Nosotros won't cover every feature of the tool below, but merely enough to give y'all a solid foundation to work from.
Earlier we spring in information technology's important to note that If you don't want to handle every aspect of your site'southward design yourself, then it's recommended to use a beginner-friendly CMS like WordPress, or another site builder.
With that existence said, it'south time to bound in! Follow the steps below to create and publish your get-go Dreamweaver website:
ane. Choose Your Plan and Install
The first affair you'll need to do is buy and install the Dreamweaver software. So, head over to the Adobe website, and cull the plan that works for you.
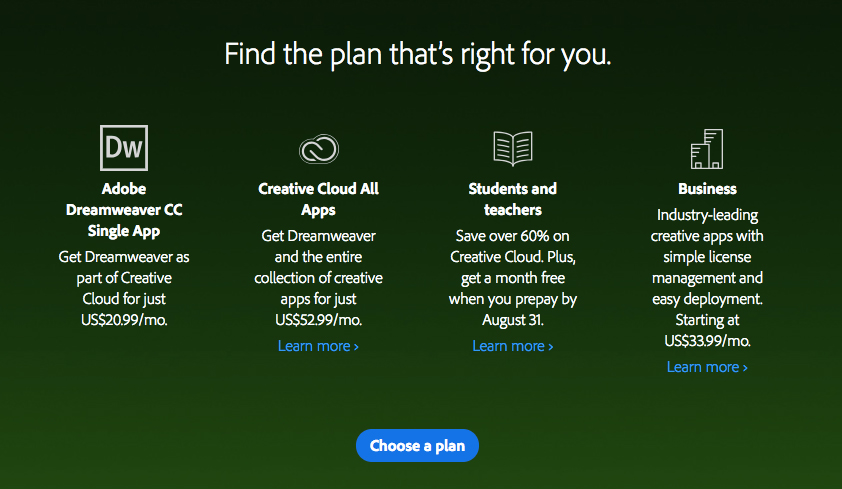
Simply the single app will currently toll you $20.99 per month. While, if you lot desire admission to the entire Creative Cloud suite you'll pay $52.99 per month. There are also discounts for businesses, teachers, and students that are bachelor also.
One time you've chosen your subscription download Dreamweaver and follow the instructions that come upwards. It'south a simple process that will merely take a couple of clicks.
Alternatively, if you don't want to pay for this software right out of the gate you can opt for the seven-day complimentary trial. This volition give you lot some time to play around with the software to see if it'due south correct for yous.
If you already have Artistic Cloud installed on your computer then open information technology up, select 'Apps' and choose Dreamweaver CC from the list. You'll accept the option for the free trial or to purchase the software right away.
two. Initial Setup and Walkthrough
After you've installed Dreamweaver the software will automatically open, and yous'll run into a screen that looks like the i below.
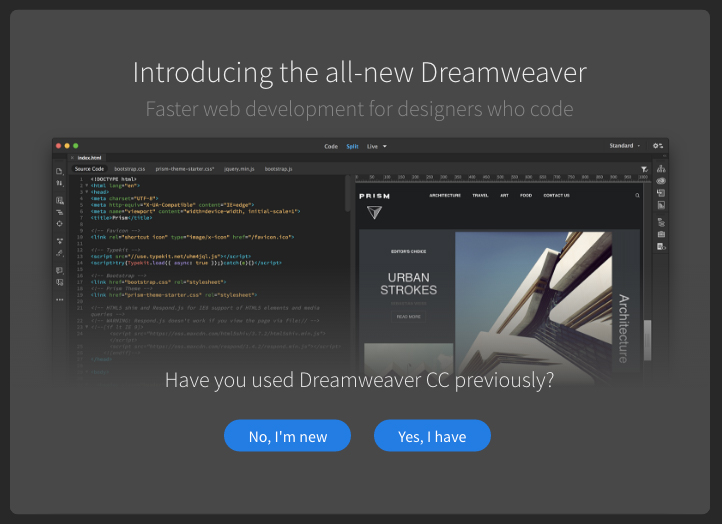
Next, select the option that says 'No, I'grand New', unless yous've used the software below. This will walk y'all through the initial process of setting up your Dreamweaver workspace.
On the next screen, you'll be able to choose the option best suited to your workflow. Since this is your first time using Dreamweaver, select the 'Standard Workspace' option.
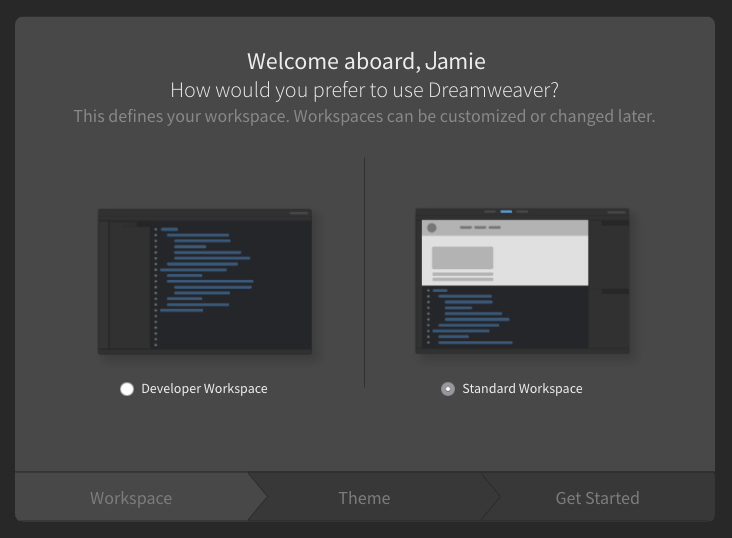
This will allow you lot to apply either the visual editor or the code to build out and customize your site.
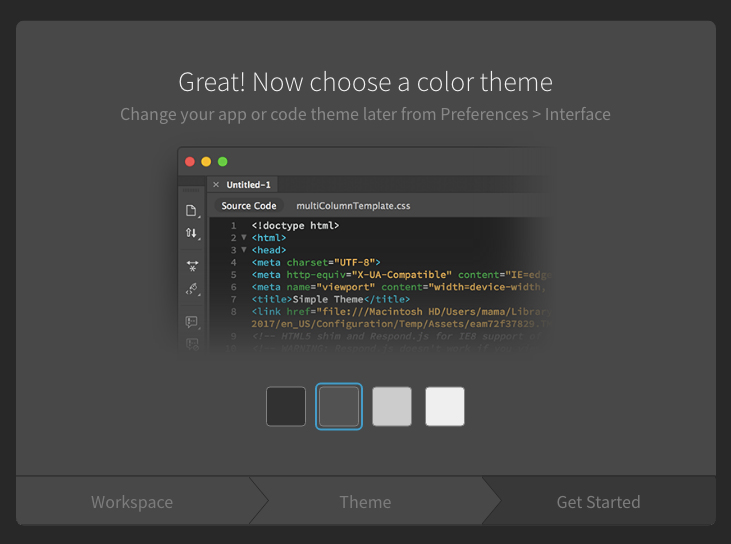
Adjacent, choose the color scheme for your editor. This isn't super important, and so just choose whichever color scheme you like best.
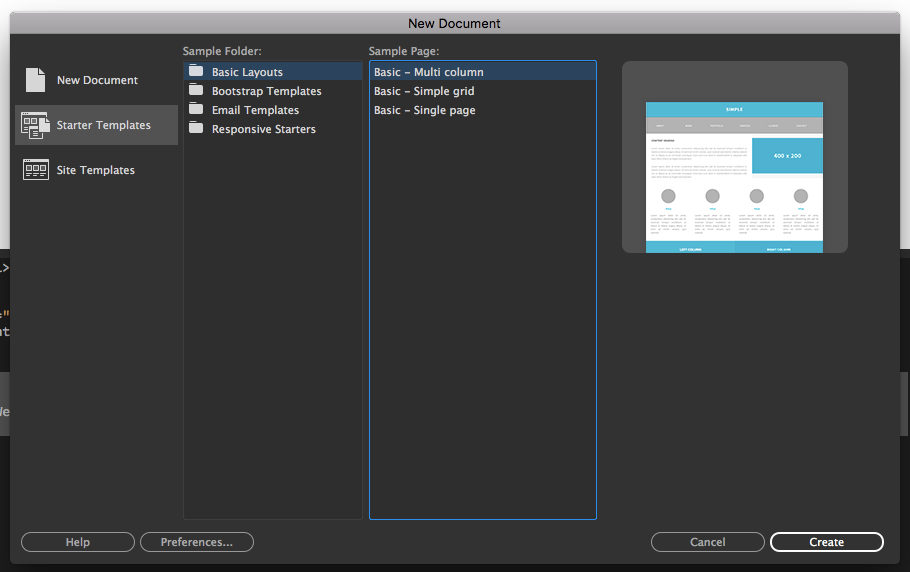
On the next screen, you'll be able to choose if y'all want to starting time with a sample site, a blank template, or watch some tutorials.
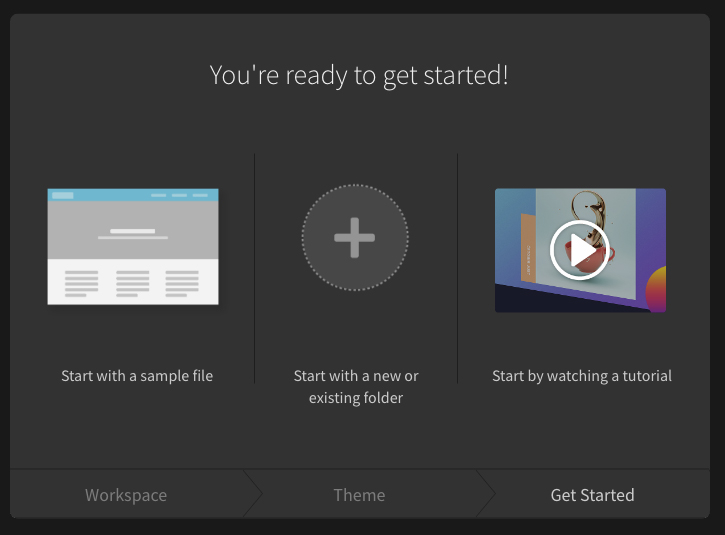
For this section of the tutorial we'll exist using the 'Get-go with a new or existing binder', simply if y'all select the 'Start with a sample file' option you'll have a bones site foundation to piece of work from, which looks like the image below.
Some people may want to get-go with a basic template, equally it'southward less intimidating. But for those who desire to continue building their sites from scratch and learning the ins and outs of this tool, then this section of this tutorial is for you.
If you lot desire to use one of the starter templates to build out your site, instead of creating from scratch, so skip to the side by side section of the tutorial.
three. Create a New Site
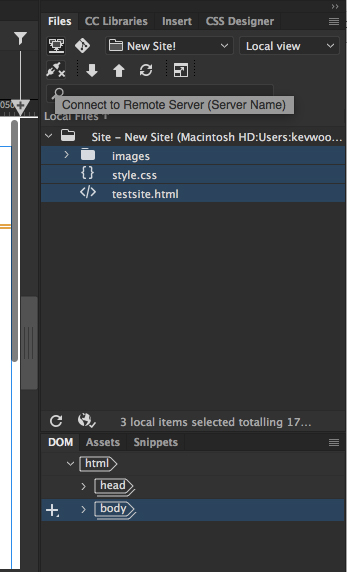
To outset building your new site from scratch navigate to Site>New Site. It should look like the screen below:
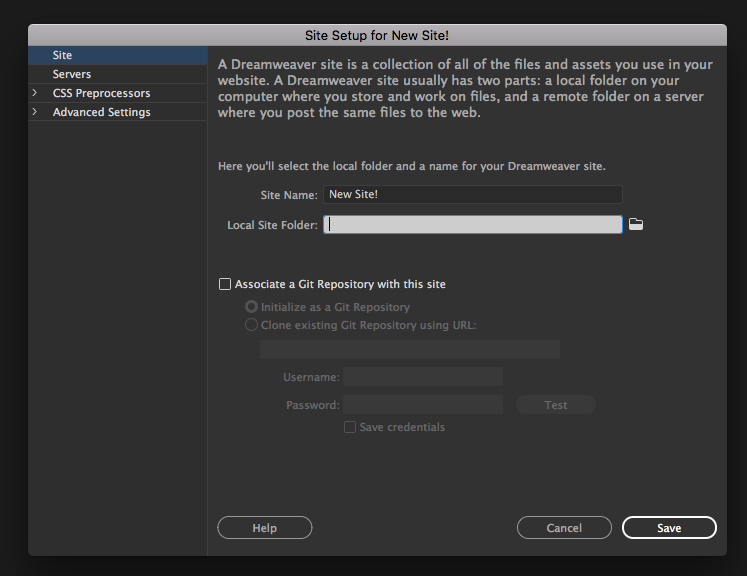
Here y'all'll want to requite your site a name and specify the location where your site's files will exist saved. Make sure you specify a folder where you lot'll take all of your web projects, as this will make organization (and later uploading to your server), much easier.
Next, you'll desire to create an images folder where all of your site's images volition go. This image folder should be located within your site's binder.
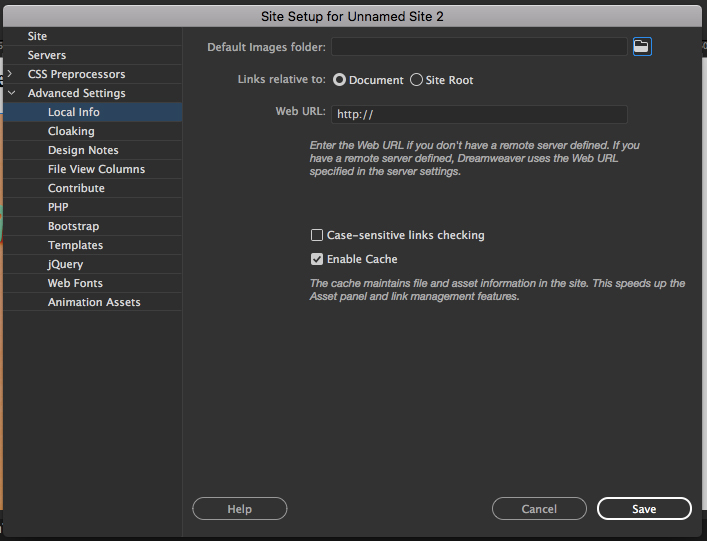
Click on 'Advanced Settings', and in the driblet-down list of options select 'Local Info'. Here you'll select the images folder y'all created a moment ago. So, click 'Save' and you're ready to commencement building your site.
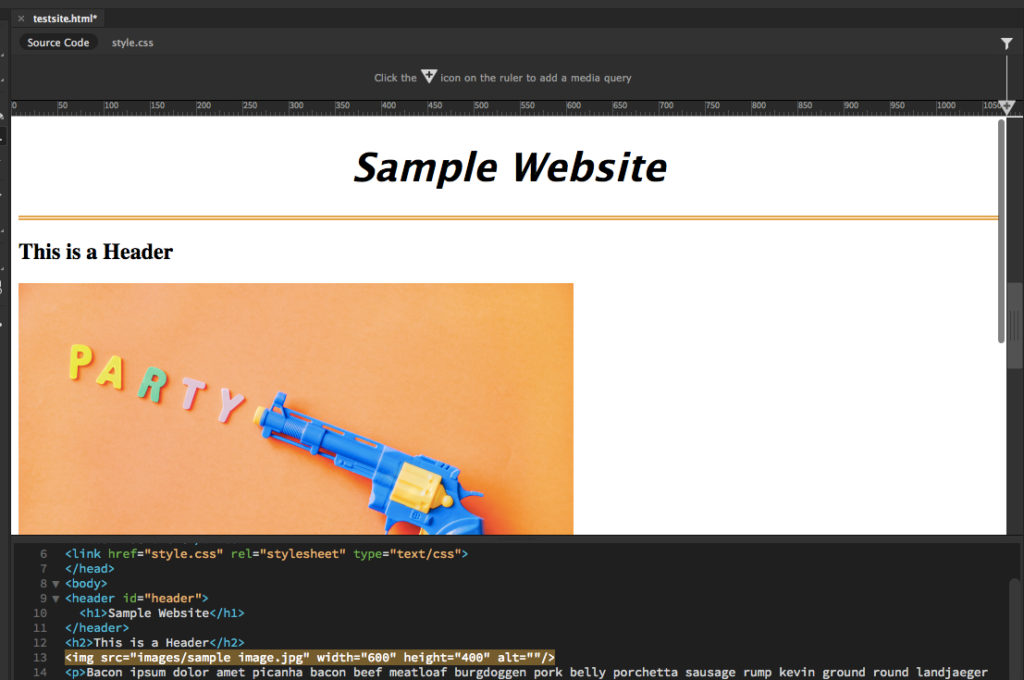
4. Create Your First Page
The outset page we're going to create will be your homepage.
To do this select File>New, and so select HTML from the 'Document Type' listing. And then, proper name the file alphabetize.html. This will assistance to give your site proper structure.
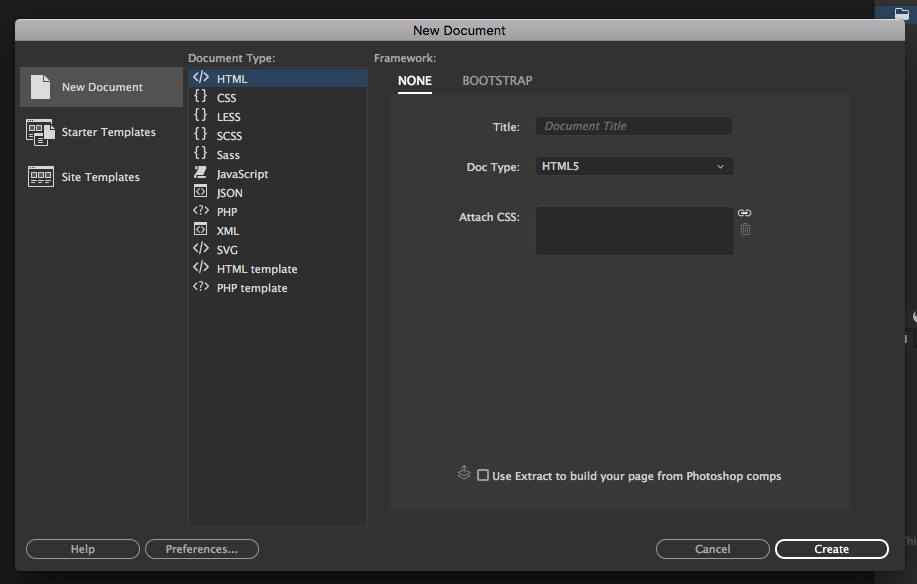
Now you should have a blank window like the paradigm below. This is what your site currently looks like! Yous'll also see that Dreamweaver has created some initial HTML likewise.
v. Create Your Website Header
The first thing we're going to practise is create your site header. This is the pinnacle portion of your site that usually includes your logo or the name of your site.
To do this click on the top portion of the page (y'all'll also see the <body> element highlighted in the code department at the bottom).
And so, click on 'Insert' in the upper correct-hand corner, and select the 'Header' option. Y'all might have to scroll down a bit to discover the option. All of the choices hither are unlike HTML elements you can add together to your site.
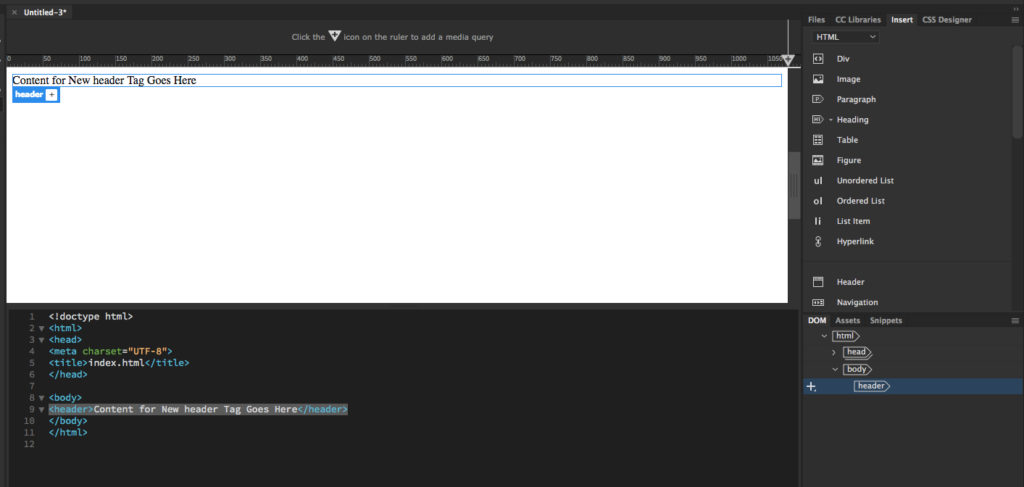
This volition insert a header block into your folio, so you can customize it to your liking.
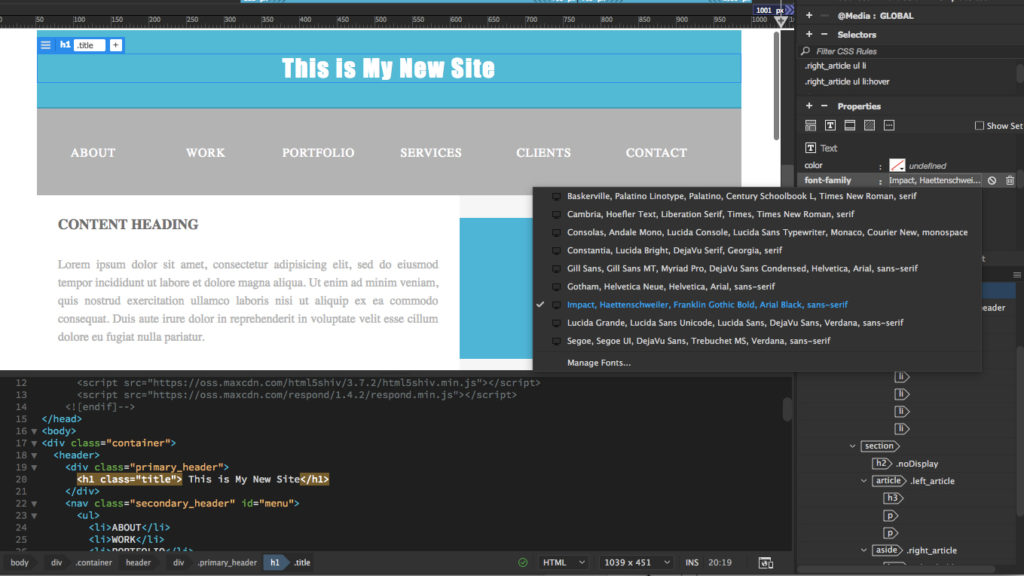
Adjacent, we're going to add an H1 tag to this header element. This is of import for SEO purposes and letting the search engines know what your site is about.
To do this highlight the header text in the code section of your editor. And so, select 'Headings' and H1 in the drop-downwards box.
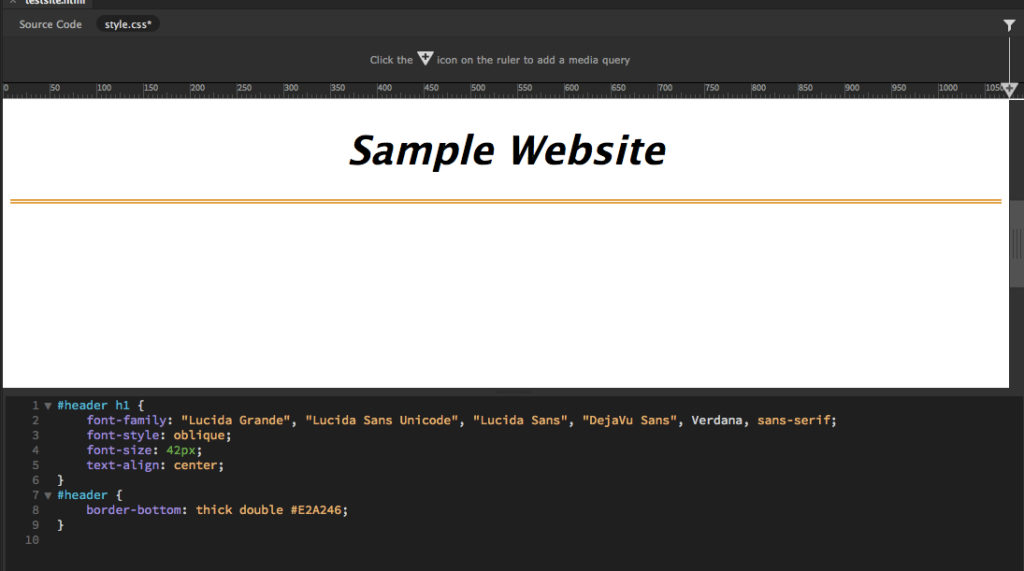
6. Style Your Page Header
With your header created it's time to give it a little style. Chances are you don't want to employ the basic styling, as it'll make your website look ancient.
We'll be making these changes with CSS. Typically, all of your site's style and display elements volition be controlled with this file. Information technology'll enable you to do things like change font sizes, create the width and dimensions for sure site elements, and a ton more.
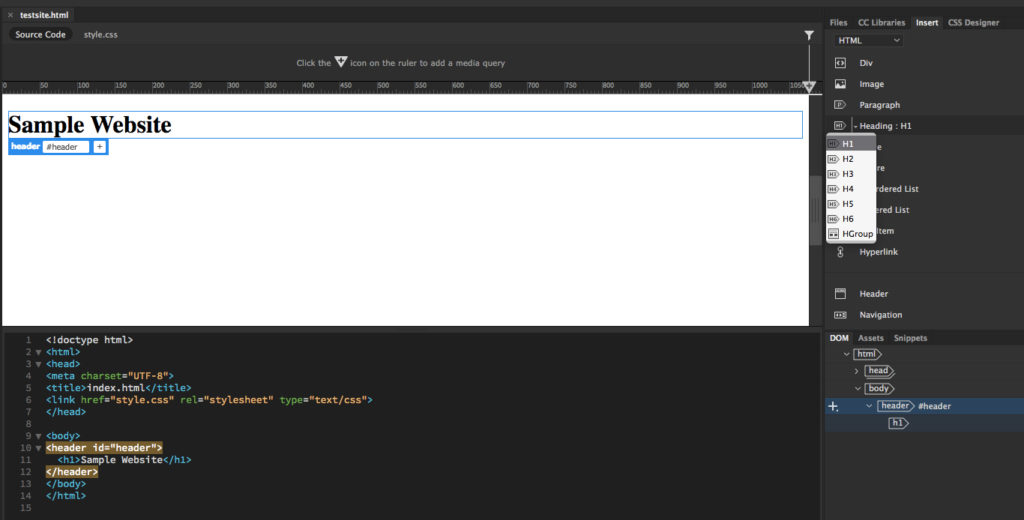
The first thing we'll be doing with your CSS file is changing how your header looks. Just first, nosotros'll need to create a CSS file.
To exercise this click on the header and yous'll see the header section highlighted in bluish. Click the '+' icon and type in #header into the box (this volition give your header an id which will permit you to customize its appearance).
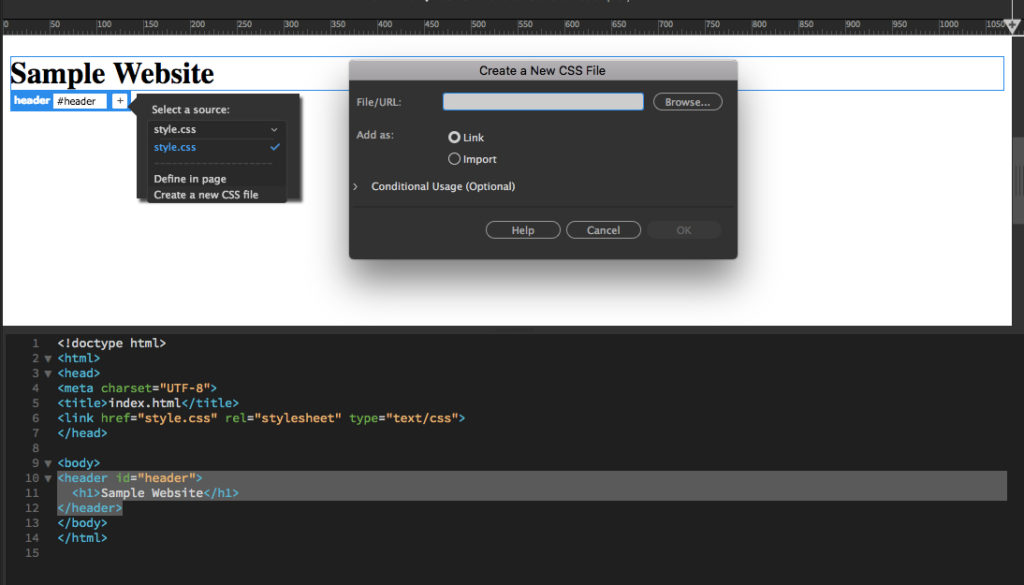
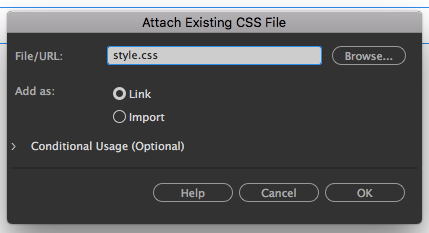
Side by side, select the 'Create new CSS file' selection. In the box that pops up select 'Browse', select the folder you created earlier where all your site's files are stored, and and then name the file 'style.css', and click 'OK'.
This file is where you will make all of your design changes.
Now with your CSS file created we'll create a selector. This volition let you to make changes to the header text without changing your entire header.
To do this navigate to the DOM editor (lower correct-manus corner), and select the H1 tag you created. So select 'CSS Designer' in the upper correct-manus corner.
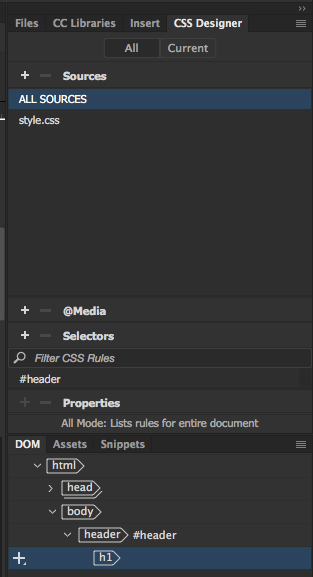
Next, click on the 'Selectors' choice and the box should automatically be filled in with '#header h1'. Press 'Enter' and you're all fix.

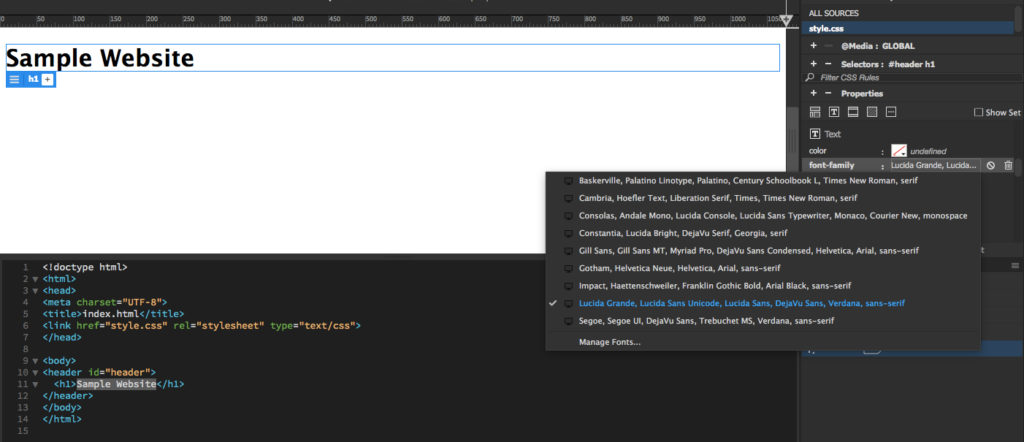
Now, it'southward time to modify your font. If you're not nonetheless in the CSS Designer carte, then click on that tab again and select the '#header h1' you lot simply created. Then in that location's a fiddling box that says 'Show Set'. Uncheck this box and you'll unlock some cool customization options.
Feel free to play around with these options equally much as yous want. You lot'll be able to do things similar alter your font, font way, text size, alignment, add borders, and a lot more.
In one case you're satisfied with how your header looks move onto the next step.
Yous can besides click over to the 'style.css' file at the top of the screen to meet how the code looks.
7. Add More Content
Chances are you want your site to be a lot more than than merely a massive header. Here's how you can add together and style different text elements on your homepage.
To add together text to your page click on the 'Insert' tab at the upper correct-hand corner, then select 'Paragraph'. If you want to have a line suspension between each paragraph, and so you'll desire to add together multiple paragraphs.
Every bit y'all'll discover in the epitome below at that place are multiple paragraphs, along with an unordered list, aka bullet points. If you want to insert an ordered or unordered listing into your page, select the 'Unordered List' option, and so click on the <ul></ul> tags in the code section. And finally, select the 'List Item' section and add that in-between the two tags.
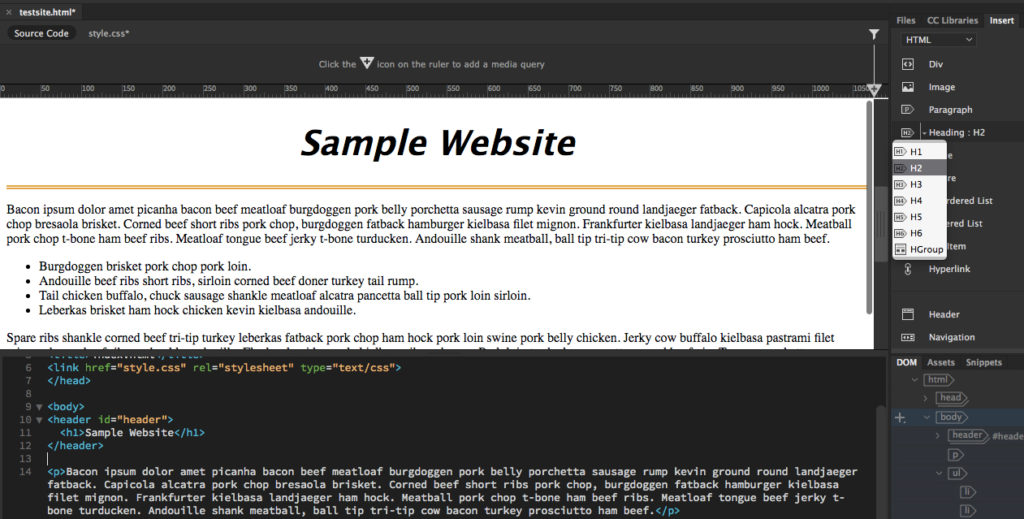
Finally, we're going to go and add a heading to the top of the page, right below the header.
To do this detect the department of the code that ends in </header>, then press enter and create a space. Next, select 'Heading' from the upper right-hand carte and select H2 from the driblet-down box.
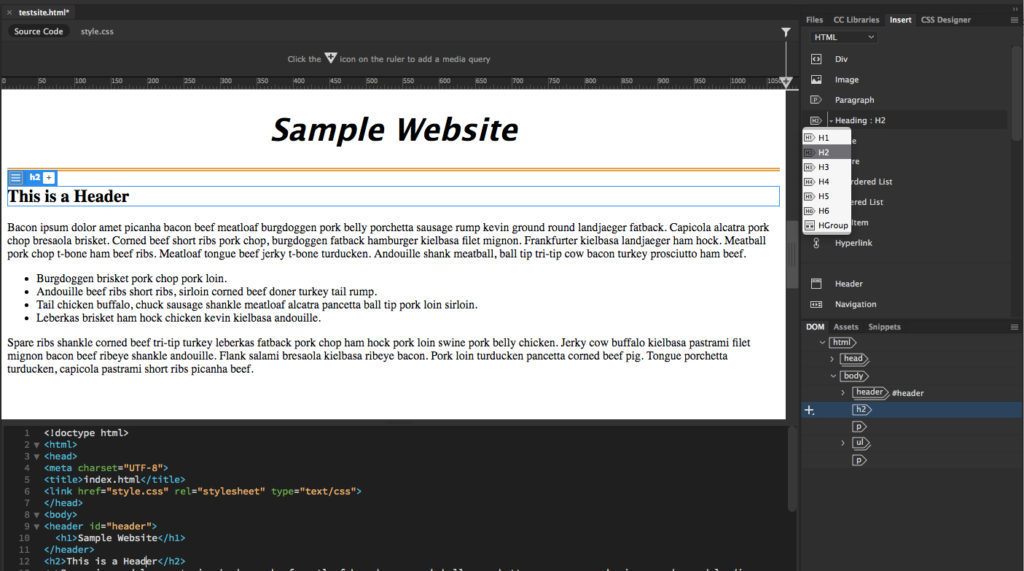
And then, y'all can customize your header text however yous see fit.
8. Add an Epitome
With your header and some basic content in identify, it'southward time to add an prototype to your site to spruce things up. Luckily, with the included stock paradigm tool, finding the right image shouldn't be besides time-consuming.
You can either use the built-in stock photo library past clicking the 'CC Libraries' tab and searching for an image. Or, you can find your own images and upload them.
For this tutorial, we chose the after. If you lot're using an prototype from the net or your own collection make sure to add information technology to the image folder yous created before. And then, select the 'Insert' tab and select 'Image'.
Here yous'll be able to locate the image on your estimator, and then printing 'Open'.
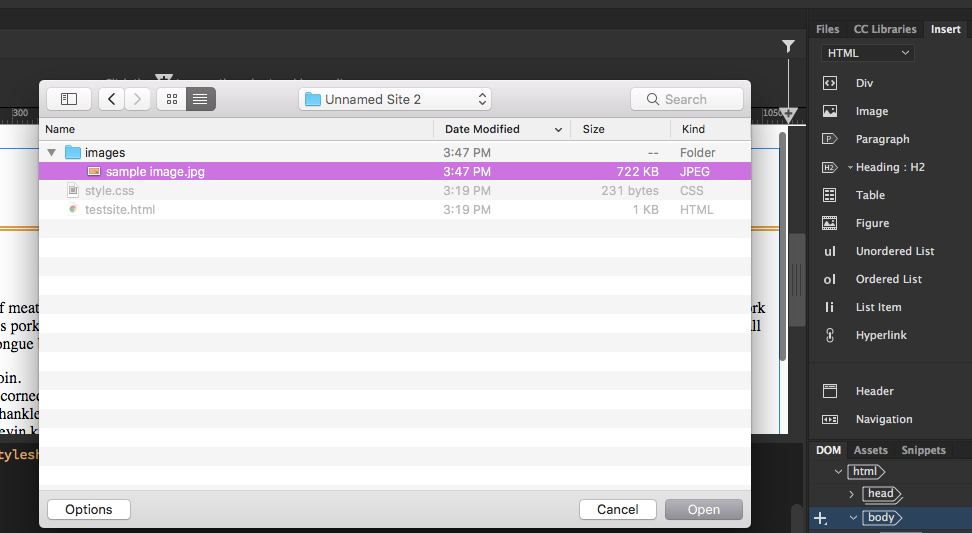
At present the software volition automatically insert the image into your page and add the proper code.
9. Preview Your Site
Once you've put together your starting time version of the website it's time to run into how it looks. Dreamweaver has a very useful built-in preview feature. This volition let you come across what your site looks similar beyond a diversity of spider web browsers and mobile devices.
This can help you catch whatsoever glaring errors before you lot determine to motion onto the next step and upload your site to your server. Information technology'south also a real-fourth dimension preview too, so any alter you make to your site volition evidence up automatically.
To preview the current version of your site all you have to practice is click the preview button in the bottom correct-mitt corner. Then, y'all can choose which browser you'd like to preview your site in.
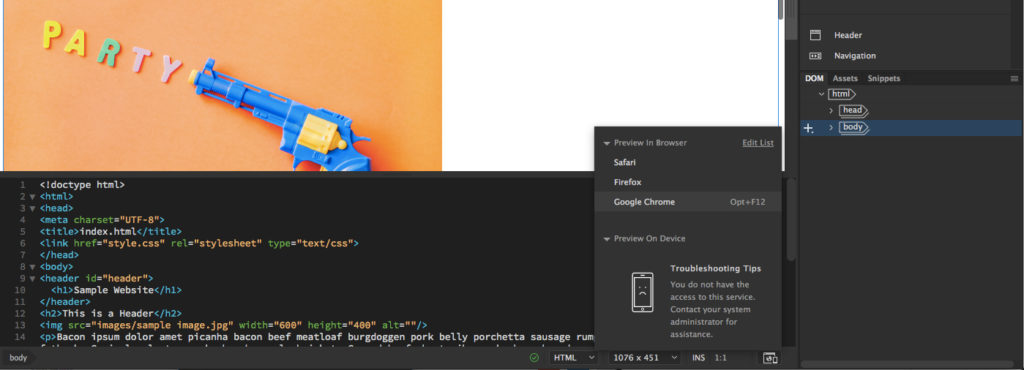
You tin also run across what your site looks like on your mobile phone by taking a picture of the QR code.
Make sure you check out both the standard browser and mobile versions of your site before you make up one's mind to publish information technology online.
Once yous're satisfied with how your site looks, then keep onto the final step.
10. Publish Your Site Online
With your basic site consummate information technology's time to upload information technology to your server. The process is pretty like shooting fish in a barrel and straightforward, merely to do this you'll demand to have previously purchased hosting. If you lot haven't washed this nonetheless, then spend some time browsing this list, and sign up for the hosting provider of your choosing.
We recommend either Bluehost or Cloudways.
Once you've signed up for a host, find your FTP data, every bit you'll need this for the next stride.
With that taken care of, you can motility onto the next step of actually uploading your site to your server.
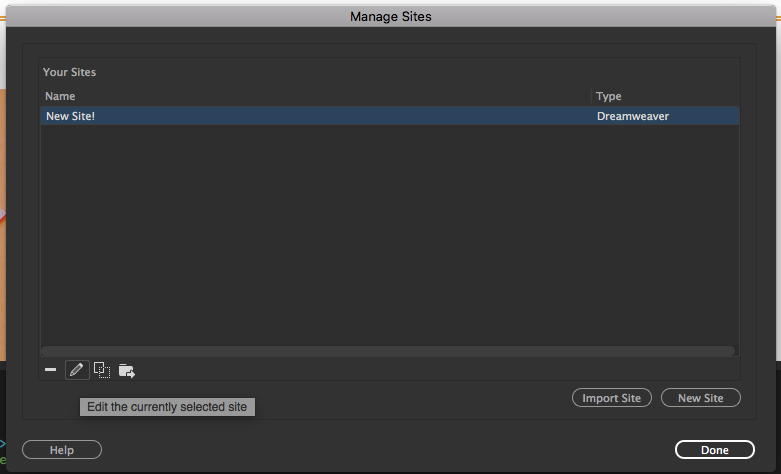
To do this navigate to Site>Manage Sites. In the window that comes upwards select your site, and then click on the pencil icon in the bottom left corner.
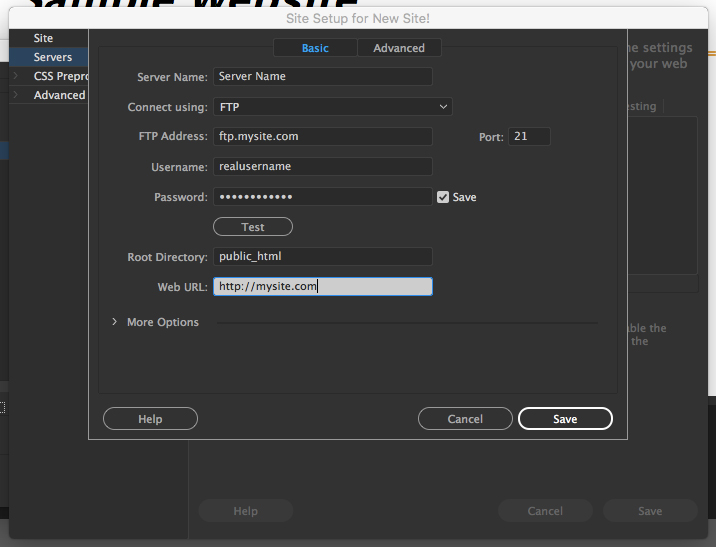
Side by side, select the 'Servers' option on the left-hand side, and click the '+' icon, which will let you to add your server information.
All of the information on this window is provided past your host, except the 'Server Proper noun' field, that's up to you. Likewise, make sure that yous that you include your server root directory and your URL. This will make information technology and then you lot can include sitewide links from within Dreamweaver that actually work.
Once you lot've fix up your server information click 'Salvage', then click 'Relieve' once more.
Now, all you have to do is select the files you want to upload from the left-mitt carte and click the icon that looks like a plug in the upper right-manus corner.
If you lot entered your server information correctly, then Dreamweaver will connect to your server and upload your site's files to the specified location.
That'south information technology! You've successfully created and uploaded your very get-go Dreamweaver site.
If yous don't experience like creating an unabridged Dreamweaver site entirely from scratch, then continue reading. Below you'll come across how you can use a pre-existing template to simplify the website edifice procedure.
How to Use a Dreamweaver Template to Build Your Website
If all of the higher up seemed pretty overwhelming, then you lot may want to beginning with a website template instead.
By using 1 of the pre-fabricated templates y'all'll requite yourself a head commencement and instead of having to create everything from scratch y'all tin can simply add together to, or delete any pre-congenital elements. This also gives you the advantage of seeing how a concluding design and codebase look side-by-side. Which can assistance to speed up your education process.
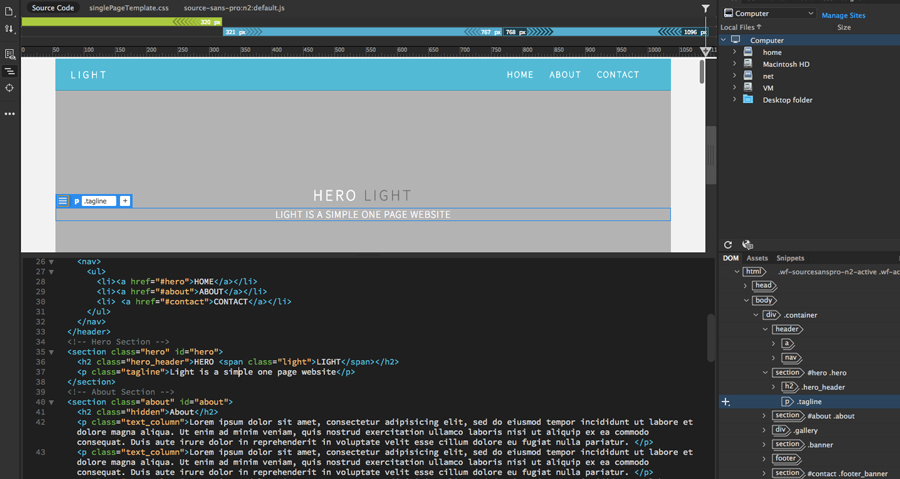
To practise this select File>New, then 'Starter Templates', 'Bones Layouts', and finally choose the style of site you desire to build. Here nosotros went with the 'Bones – Multi Column' layout.
Y'all'll see that this template gives you a lot to piece of work with right out of the gate.

Nosotros'll do some bones things like changing the name of the site and header text. To do this we'll follow a process similar to the one to a higher place. To change the header text simply click on the header element and type in your new text.
To change the font select the <h1 class="title> section of your code. Then on the right-hand side click the '+' button next to 'Properties'. Here you lot'll be able to change your font past selecting the text pick that looks like a capital 'T'.
You can practise the same thing to other elements likewise. For example, you can change the fonts type and size. Add an image to the pre-existing image blocks and more.
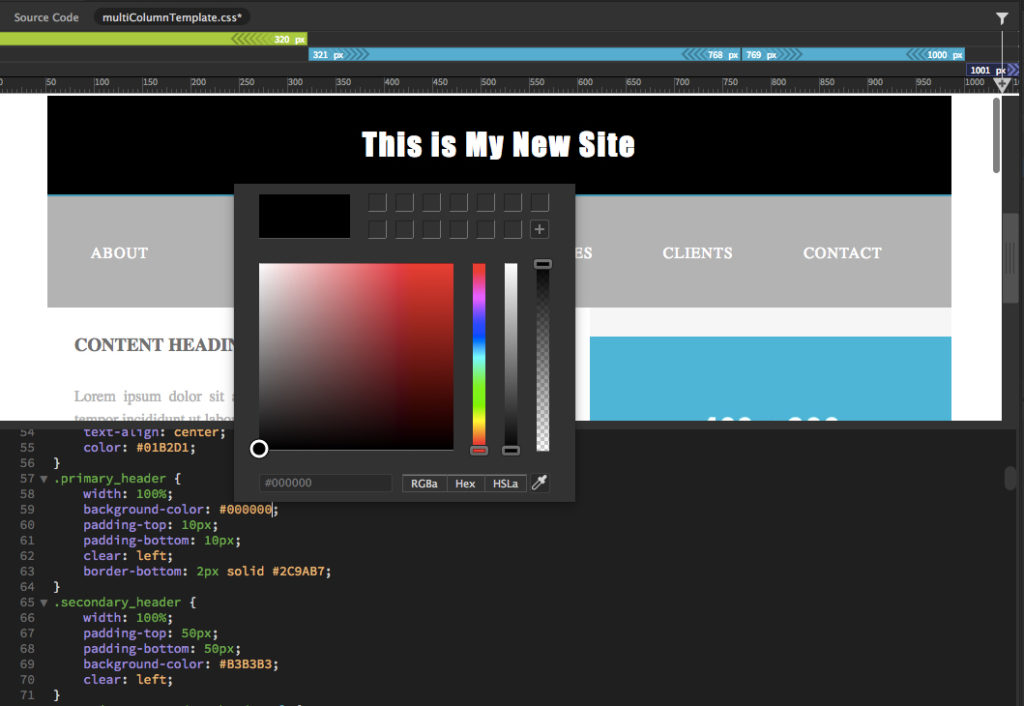
But before we get out you to customize this template to your own liking here'southward how you can quickly edit the color of the header background.
You tin can take the to a higher place approach to adjust the color using the 'CSS Designer' option. Or, y'all can get directly into the CSS file.
To exercise this take annotation of the div form for this chemical element, which is "primary_header". Next, click over to the 'multiColumnTemplate.css' file at the top of the page.

Hither we tin alter the header groundwork colour once we discover the ".primary_header" chemical element.
Of course, in that location'south a lot more than you can practise when y'all're working with a template, but hopefully changes above give you an thought nearly what you tin can practice.
One time you've made the necessary changes to your site template information technology'south time to push button the site to your server. Just follow the same process as steps 9 and 10 above.
In Endmost
Every bit you can run across Dreamweaver is an incredibly flexible website builder. With it's easy to utilise user interface, and congenital-in lawmaking editor you can build any kind of website you desire. Since it's such a versatile tool it's usually used past beginners, all the way up to advanced web developers.
Above you learned to how to grasp the basics of Dreamweaver and get your very first site online. It'due south near impossible to cover every aspect of Dreamweaver in a unmarried blog post, but once yous sympathize the basics it's up to you to go on your instruction. If you desire to explore further there'due south a massive video tutorial library on the Adobe site you can explore.
However, proceed in mind that Dreamweaver isn't the just tool yous can utilize to build a website. In fact, in that location are simpler methods that exist, that using WordPress, and customizing a beginner friendly theme.
But, if you do make up one's mind to build out your website using Dreamweaver hopefully you're better equipped to become your site upward and running in as picayune fourth dimension every bit possible.
At present over to you. Have yous used Dreamweaver to build out your website? Any absurd tips or hacks yous could add? Delight share away in the comments below.
Also cheque out my Dreamweaver keyboard shortcuts to speed up your spider web building tasks.
The post-obit two tabs change content below.
- Bio
- Latest Posts
My proper noun is Jamie Spencer and I take spent the past ten years edifice money making blogs. After growing tired of the 9-5, commuting and never seeing my family I decided that I wanted to make some changes and launched my first blog. Since then I have launched lots of successful niche blogs and later on selling my survivalist blog I decided to teach other people how to do the same.
sullivanlifecyll92.blogspot.com
Source: https://makeawebsitehub.com/dreamweaver-tutorial/
0 Response to "Can You Upload Wordpress Template in Dreamweaver"
Post a Comment